RV electrics: Finding your shorts
"No, this is not an exercise in laundry hunting, as the title suggests, we’ll talk about tracking down electrical circuit problems. What’s the telltale for a short circuit? Blown fuses, tripped breakers, and occasionally a melted component. Happily the latter is a rare occurrence, as the fuse or circuit breaker should provide the protection needed to stop a catastrophic issue like a melt-down from happening. In this blog we are discussing tracking down electrical shorts in low voltage, battery power circuits. AC (shore power) circuits are a bit of different animal, and we’ll talk about them later.

A little background: Electrical current flows from a power source (in our RVs, oftentimes the house battery) to a load, like a light, water pump, or some other power user. On the way it may travel through a switch that will shut off the load by stopping the flow of electricity enroute. An electrical load provides resistance to the flow of current or amperage. Without the load of resistance, current flow increases dramatically, blowing the fuse or tripping the breaker-a short circuit. Too much load on a circuit will also trip a breaker or blow a fuse. Check it out by reducing the loads on the circuit–if no safety mechanism trips, you’re ok.
Finding a short circuit is a multi-step process:
First, Look things over and scratch your head. Have you recently put a screw or nail into something (a wall or ceiling)? Penetrating a wire with a metal object is a quick way to create a short circuit. You may get a breaker trip or fuse blown if some current carrying object (piece of metal for example) falls across a positive (hot) wire and connects up to ground. Eyeball where you can.
Next, try resetting the breaker or replacing the fuse. If these fault out again, you’ll need to move to the next step. If the fuse holds up or breaker doesn’t trip, it may have been a fluke. It happens, but only occasionally.
Drag out your multimeter and set it for ohms. Disconnect the circuit from the power source on the positive side. Perhaps the easiest way to do this is to disconnect the positive lead from the house battery, and make sure the power converter is turned off. Leave the power switch to the load turned on. Now disconnect the load (for example a light fixture), taking off both positive and negative wires. Using your multimeter, test the load device.
In RVs, with the exception of a fluorescent light, nearly all load devices will show some resistance. If you read 0 ohms of resistance, reverse the leads and check again. Why? Some electronic loads show resistance only in one direction, although incandescent lights will show it both directions. Still no resistance? Then there is a short circuit in the load device. Fix it or replace it.
If the load shows resistance, you’ll need to look further in “detective mode.” You’ll be looking for continuity, or zero resistance, where there should be none. Where should there be no continuity? Since you’ve disconnected the load from the circuit, there should be no continuity between the negative lead and positive lead at the load end. Touch your probes to both leads. If zero ohms, or a few ohms read, there is a short in the circuit.
Test for where the short is by leaving the multimeter probes hooked up to the wires at the load end. Now remove the fuse for the circuit, or disconnect one of the terminals from the circuit breaker. If the meter reads infinite resistance now, you’ve found the short is between the fuse and the positive battery terminal. If the meter still shows zero resistance or a few ohms, the short is on the load side of the fuse.
To track it down more, put a good fuse back in the fuse holder or reconnect the lead to the circuit breaker. Now turn off the power switch to the load. If the meter reads infinite resistance the short is between the fuse or circuit breaker and the power switch. If the meter indicates zero resistance or a few ohms, the only place left for the short to be is between the switch and the load device.
RV wiring inside walls or ceilings is a major frustration, as manufacturers can run stuff darned near anywhere. If you can get a copy of the wiring diagram from the manufacturer it may help. If you suspect a nail or screw may be the cause of your problems, try pulling it out and starting out fresh. Often getting the offending object out of the wiring will fix it, and in a low voltage situation may not present a safety issue. Still, it’s best to get to the wire to properly repair the damage if at all possible." Posted by Russ and Tiña DeMaris.
_____________________
New RVer asks: Why is my air conditioner dripping?
"It can be a bit disconcerting: You've got the RV out for a trip and you notice water dripping down the side of the rig. There's not a cloud in the sky, but water is flowing away merrily. Or it could even be worse: You flip on the air conditioner on a hot day and after a short while, a nasty drip, drip, drip of water falls from your air conditioning unit--onto the floor--INSIDE your RV!
What's going on? In one instance, nothing unusual, and not a thing to be worried about. In the latter, a normal thing, but happening in a place where it ought not. The water that you might see streaming down the side of your rig (or off your awning) is simply a byproduct of the weather: Condensation.
Every time you fire up your RV air conditioner, it pulls humidity out of the air inside and puts it outside. The higher the humidity, the greater the amount of water produced. Typically the condensate rolls into a pan in the base of the unit that lives above the roof line. That drip pan has small holes that allow the condensed water to harmless drip out on the roof. If the weather is hot enough, the the condensate small enough in volume, it may well evaporate before it can run off to the side of your rig and down the side. If not, just expect it.
When you see water dripping into your RV and there's not a cloud in the sky, the chances are good it's still air conditioner produced condensation, but unfortunately, it's not making its way harmlessly onto your roof. The most likely problem is that dirt, leaves, or other junk have gotten into your a/c unit and blocked the drain holes in the bottom of the pan. If the level gets too deep, it runs up and over the lap of the pan and makes its way into your RV. Left unchecked it can be worse than a nuisance, it can actually damage your rig.
The fix is easy. Turn off the air conditioner unit. For safety sake, put a "lock out" tag on the switch or thermostat to warn others not to turn it on, or better still, disconnect the power to the RV. At roof top level, remove the shroud covering your a/c unit. Typically a few screws or nuts hold it in place. Carefully lift the shroud and set it aside.
Now look closely at the pan at the bottom of the unit. Remove any debris that blocks the drain pan. With the holes uncovered, your inside 'rain showers' should be a thing of the past." By Russ and Tina DeMaris
___________________
If it is an older RV, it might be the AC's gasket:
After repairing AC for a leak, an RVer wonders if did it wrong. By Gary Bunzer
"Dear Gary,
I have a Coleman air conditioner on the roof of my RV. I had a problem with water leaking inside through the air conditioner when it rained so I sealed around the edges of the roof unit. I have since been told not to do that, that the condenser must drain onto the roof and now I will have that condensate coming inside. I removed the shroud but am unable to locate the hole or holes in the drain pan to see where it drains. Could you tell me where the holes are located so I can make sure they are clear and draining properly? The unit is so old that I am afraid to remove it to replace the 14-inch gasket." -- Gus Tarver
Dear Gus,
"Indeed the only water seal on the roof air conditioner occurs at the perimeter of the 14-inch opening. The air conditioner sits atop the 14-inch gasket only. Condensation must drain through the pan and onto the roof of the RV outside of the 14-inch opening. The holes in the pan may be located under various internal components making them hard to see by simply taking off the shroud. You may be able to locate them by using a flashlight and a mirror, but they must be clear to allow the pan to drain.
The fact that you have rainwater leaking under the air conditioner mandates the unit be removed from the roof and a new gasket installed. It's likely the constant weight and possible over tightening of the mounting bolts have compressed the gasket beyond usefulness.
Remove the interior shroud and the filters and you should be able to see three mounting bolts that can be removed. These bolts sandwich the roof between the bottom of the air conditioner and the interior plenum. Be sure to disconnect the AC power before removing the plenum.
Once the plenum is down inside the coach, the air conditioner can be carefully lifted off the 14-inch opening on the roof. Take care lifting the unit so that the roof material does not tear during the process. It's best to use two people to remove the unit from the roof. Once exposed, the 14-inch opening can be cleaned and a new gasket installed. Do not over-tighten the mounting bolts. You only want to compress the gasket enough to prevent leaks while securing the air conditioner."
http://rvtravel.com/RV_Doctor_160/rvdoctor384.shtml
_________________
When we have done this, we placed the AC on some 4x4 blocks instead of removing it completely off the roof.
___________________
"Almost" free breakfast at Flying J
"Out on the road and looking for a cup of Java and a breakfast sandwich? Flying J has a print-it-and-bring-it coupon right here. The catch? OK, it's not absolutely free, it'll cost you a buck. The offer works ONLY at participating Flying J locations, NOT at Pilot."
_____________________
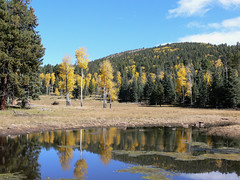
Camp free or cheap at fish and wildlife refuges

"Be on the lookout for Fish and Wildlife refuges, both national and state, for good boondocking and cheap camping opportunities. When there is no hunting season active, these refuges can be deserted. Though policies vary with each state, generally you can camp either free or very cheap.
Some refuges can be quite scenic, on ponds maintained for ducks for instance (photo - Finney-Ramer Unit of California's Imperial Wildlife Area). In some states (California is one example) you can camp free if you have a state fishing or hunting license. If not, you can still camp but will have to pay, usually a very reasonable fee.
Check online or at regional Fish & Game offices for policies and locations--but avoid during hunting seasons." See: http://www.nrahq.org/hunting/statefishgame.asp
_____________________
RVing by whim instead of reservations

"If you find your RV life still controlled by working life remnants (calendars, appointment books, itineraries), it may be time to throw them into the campfire--along with the perceived necessity of having to make campground reservations.
Instead, commit yourself to whims. Decide on where you will camp tonight on whatever comes up that day and wherever you happen to be when you want to stop for the night. You can do this by having a couple of good campground directories, including one that lists free and cheap campgrounds--as well as similar websites bookmarked (you can find these at RV Bookstore).
And learn boondocking skills so that if you don't find a campground, you can stop at a rest stop, in a national forest, at a Walmart, Flying J, Cracker Barrel, or other commercial location--in fact anywhere you find comfortable. You may find this new freedom from reservations both exciting and exhilarating. "
____________________
Fire storm ravages New Mexico monument
 "Bandelier National Monument, a park preserving the history of Pueblo people and showcasing some of New Mexico's breathtaking scenery has suffered a huge blow. The fire that threatened Los Alamos National Laboratory turned and has burned over half of the park's 33,000 acres.
The Las Conchas Fire roared through the monument, incinerating 11,000 acres of the canyon's 12,000-acre watershed. More than 4,000 acres were so severely burned that no vegetation remains. One of the toughest hit areas was the monuments most visited spots: Frijoles Canyon. The canyon receives approximately 95 percent of the monument's visitation and is home to the Monument's only visitor center, the largest concentration of prehistoric cultural sites, the historic Civilian Conservation Corps district, offices, several popular hiking trails, and employee residences.
While the visitor center was left untouched by the fire, efforts are underway to prepare it and other structures in Frijoles Canyon to withstand potential flooding. Artifacts and exhibits have been removed from the visitor center and relocated to secure storage areas. Sandbags and diversion dikes have been strategically placed to seal the visitor center and divert water away from facilities and historic sites in the canyon."
Sections of Bandelier National Monument Reopen: http://www.nps.gov/band/index.htm
Sections of Bandelier National Monument (see list below) reopened to the public on Friday, July 15, 2011. Most of the park will remain closed for the foreseeable future. The Las Conchas Fire, which began on June 26, has burned over 50% of the park's landscape and has left Frijoles Canyon, where the visitor center and main sites are located, subject to flash flooding.
____________________
Yesterday:
After leaving messages on Jay's and Ray's answering machines, and getting no replies, I was glad. I didn't feel like working out there in the heat. Jay thought that I was going to take a gal down the street on my Wednesday shopping trip, and he didn't want to go, so he didn't call me back. Shopping was postponed as I wasn't going in to Conroe unless I could pick up the washer, dishwasher, or both from the repair shop. Ray and Shay were busy paying bills and shopping, so Ray didn't want to work either. Thankfully, our SS checks had showed up!!
It is difficult for someone like me to know if they have a cold, as my sinuses are all messed up with cysts, and so I can't blow my nose. (That was all the Ear, Nose and Throat doctor said, and didn't not even suggest a remedy) Maybe this is why I have felt so tired the last couple of evenings. The other day, I remember being in a grocery store and wishing I had my sweater out of the car. Being in really cold air conditioning usually makes me feel like this.
Hoping a nap would get rid of this vague achy feeling, but I couldn't sleep, so I just took it easy all day.


2 comments:
Going from A/C to the heat and back into a cool house or car can really mess up your head, literally. I get a quick headache with every change - it goes away within a few minutes but I know it's from the difference in air.
You needed a day off to rest up.
Post a Comment