Drippy RV Faucets
 "How do you repair the bathroom faucets? I have a two-handle faucet in the bathroom that looks to be all metal and they constantly drip. How and what do I replace?" Mike R. (Richmond, BC)
 "Mike, the most common cause of dripping faucets is debris or mineral deposits becoming stuck in the assembly so let’s not be too quick to condemn an innocent faucet... "
More Link
_______________
Don't put up with a leaking RV bathroom faucet!
This is the same for an RV or a stix-n-brix."A couple weeks ago Mrs. Professor told me she thought the bathroom faucet was leaking. Fortunately it was dripping into a dishpan where we keep cleaning supplies. As it turns out, one of the valves was leaking.
Replacement valves are available for almost all faucets and it's an easy job to pop out the valve and insert an new one, but we opted to install a new faucet that matched the other accents in the bathroom. I shopped around for a suitable replacement at an RV liquidation store, Camping World and another RV dealership all to no avail.
 Most modern RV's use standard faucet fixtures, so I decided to look at a local plumbing store and found exactly what I wanted. The only problem was the price... $150.00!
 I don't mind paying for quality merchandise, but my "inner shopper" was urging me to check Ebay before purchasing it at the plumbing store.
A few clicks of the mouse and I was able to buy the same faucet made by Price Pfister for $45.00 including UPS ground shipment.
The remainder of this story is a pictorial "how to" for installing a bathroom sink faucet.
You may want to bookmark this page for future reference.
 The new faucet shipped complete with all the parts I needed for the project.
  First turn off the water to the RV including the water pump and place a dishpan under the sink to catch any excess water runoff.
Reach under the sink, loosen and remove the water supply nuts and the retaining nuts holding the old faucet in place.
Mark your hot supply with tape or whatever.

Remove and discard the old faucet (if it's metal you may recycle it).
Thoroughly clean the surface under the old faucet.

Place a scoop of Plummer's Putty (available at your local hardware store)
 into the palm of your hand.
Roll your hands together making a rope of the putty.

Fill the plastic putty plate with the putty rope and attach it to the faucet face plate.

Insert the faucet head through the opening of the face plate.

Place the assembled faucet into the existing holes on the sink.
 This is a single control lavatory faucet replacing a dual control four inch faucet. The existing holes are covered by the putty plate and face plate assembly for a nice finished look.
 The single control faucet has a long bolt that extends down the back of the sink. Secure the faucet using the supplied crescent shaped washer and long nut.

Connect the water lines using the supplied adapters. Be sure to put a thread compound or Teflon Tape on both ends of the adapter threads.
 If you are particular which side you want the hot control (usually the handle to your left) you will need to look at the faucet water lines and match them accordingly with your hot and cold water lines.
 Remove any excess Plumber's Putty from around the edge of the faucet base and you're finished with the faucet installation.
The next part of this job is the drain.
Set the "P" trap assembly aside until you are ready to reassemble it.
Remove the spring clip to free the ball rod (this is the small diameter bar sticking out behind the drain pipe used to raise and lower the stopper).
Begin by removing the "P" trap from the old drain pipe. Most of the time you can loosen the nuts by hand, but sometimes a strap wrench is required to break the grip of a stubborn nut.

Unscrew the threaded lock nut using channel lock pliers. Loosen the drain pipe by turning it counter clockwise using the old ball rod as leverage.
 I used a long Phillips screwdriver to hold the old drain flange while I unscrewed the drain pipe.
Clean the drain hole thoroughly

and place a bead of Plumber's Putty around the hole.

Do the same for the new drain flange.

Place the drain flange into the drain hole and screw the new drain pipe into the flange (be sure to end up with the hole for the ball rod facing towards the back of the sink).

Tighten the new drain pipe lock nut forcing the rubber gasket to seat into the bottom of the sink drain hole.

Remove the excess Plumber's Putty from around the drain flange and insert the stopper with the ball rod catch facing towards the rear of the sink.

Insert the ball rod into the threaded opening on the rear of the drain pipe and secure it with the locking nut.
 Do not over tighten this nut, it must have enough play to allow the plastic ball to rotate in the socket.
Insert the pull rod through the small hole in the back of the faucet and attach the adjustable strap with the retaining bolt.
 Adjust the ball rod assembly to the appropriate height and secure it with the spring clip.
  Reattach the "P" trap and test your faucet and drain for leaks.
 Enjoy your new faucet. Jim Twamley, Professor of RVing
____________________
Weeping water heaters, don’t let drips drive you dingy
“Cast him into outer darkness; there shall be weeping and gnashing of teeth.” — Matthew 22:13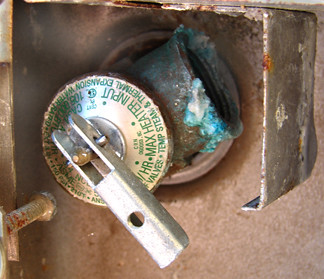 "There are some RV problems that just make you want to take the Lord’s admonition to heart.
 A weeping water heater safety valve can be one of those issues. Water oozing down the RV sidewall, emanating from the water heater can leave an unsightly mess, and in some cases, be damaging to the water heater itself. But before you condemn your safety valve for eternity, here are a few things to check.
First, a couple of lessons you learned in physics, but may have forgotten: While air readily compresses, water does not. Your RV water heater safety valve is there for a reason: When internal tank temperature or pressure increases beyond a safe level, the safety valve allows that build-up to go away safely. However, even the normal process of heating water can create a pressure that may be a bit too much for the safety valve’s liking, hence, a dripping, weeping valve can be the result.
How to cope? Having a head of air in the top of the heater tank can help when the water heats–expanding. The air in the tank will compress, allowing things to settle down. If there’s no head of air in the tank, then the water presses directly on the safety valve, opening it up to drip, drip, drip. Water heater air heads (pardon the pun) will eventually shrink and go away. You can easily restore the air buffer:
1. Turn off water heater gas and water supplies.
2. Open a faucet inside the rig.
3. Pull the handle of the pressure relief valve until it snaps open and remains that way on its own. Air will now enter the tank.
4. Snap the valve shut again.
5. Turn on the water supply. After the “filling with water” sound stops, relight the heater.
Sometimes a bit of crud can lodge in the safety valve seal. We find it safest to execute this next trick with the heater shut down, and COLD. With the water supply on, rapidly open and close the pressure valve several times. Water will indeed come gushing out of the valve, hence the “do this when the tank is cold” admonition. Once you’ve blasted the valve clear, you’ll need to go through the “restore air” steps cited above.
At times a heater safety valve will actually get tired out and just not respond to any of these tricks. In that case, you’ll need to replace the safety valve, which is a subject for a future posting."
________________
Yesterday:
The ongoing saga of my Health card. The lady, Cynthia, for whom I had left a voice mail, called. I was under the impression that it was another phone number to my HMO, but she was with the National Council of Aging. http://www.ncoa.org/.
So once more I had to explain the situation, give my health care numbers, name, address, phone number, DOB, and what color shoes I was wearing. Seemed like that anyway!
Cynthia didn't know why my co-pays were wrong on my card, and she arranged a three-way call to my HMO. Once more all the information had to be repeated, but at least we got somewhere. The lady at my HMO, Maggie, said to Fax a copy my letter of benefits and a copy of the card. I copied them, and had lunch while I thought about it. It was very hot outside, and I don't usually like to go anywhere in the afternoons.
My Fax hasn't worked since I had the second phone line taken out last year, and it was too much hassle to try to make it work on one phone line. BTDT.
Our new Kroger's has Fax service, so I thought I would quickly drive down there, and be back in time to see Dr. Oz on NBC Channel at 3.00 PM.
After driving up and down the hills for the 2+ miles to the freeway, all I saw was a south not-bound parking lot. It looked like it stretched from Huntsville to Conroe. It was as far as the eye could see in either direction.
So I stayed on the feeder. Once I was over that hill, I could see everyone was stopped there, too. Lots of drivers on the freeway were cutting across the median so the feeder road was stacked up too, as there are stop signs at Longstreet and FM 1097.
It took 30 minutes to go 2+ miles, but I finally made it to Kroger's. The weather is still 10 deg. over normal, so I used that as an excuse to walk around the whole store to get some exercise. Eating cheese samples probably counteracted the walking
.
When I got home I looked at: http://www.facebook.com/pages/Montgomery-County-Police-Reporter/233489574447


1 comment:
Back before I was on Medicare and had no insurance, life was much easier especially going to the doctor's. I just paid cash, and since I was paying, I made sure he understood that he was working for me!!
Post a Comment